
 By Admin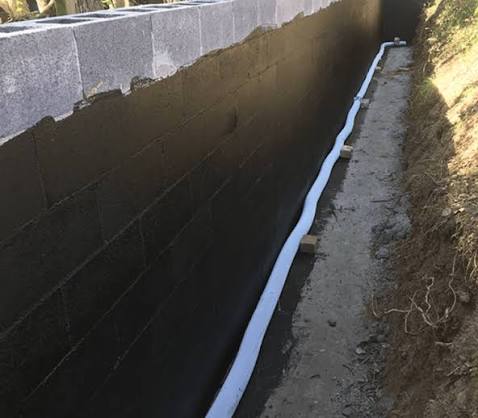
Last updated: September 10, 2026
Key Takeaways
- Clean angular gravel usually has substantial open space, but not 100 percent.
- A common drainage zone is 12 to 24 inches behind the wall.
- Use 12 inches as a minimum practical stone zone and 18 to 24 inches where water loads are heavier or soil is tighter.
- How fast can it collect after a storm?
- For guidance on drainage and retaining walls, consult a qualified local professional and check local code requirements.
Twelve feet? No. Three to eight feet is the range here, and that changes the whole job. If you are figuring out how to calculate retaining wall drainage needs, the real question is blunt: how much water has to get out, and where does it go? This guide to how to calculate retaining wall drainage needs is for homeowners, small contractors, and landowners planning a wall that is roughly 3 to 8 feet tall, where the wall is holding back ordinary soil and groundwater, not a highway embankment or a dam. I am assuming you already know the wall’s approximate height, length, and backfill depth, and that you can measure a slope with a level or laser.
Not every wall belongs in the DIY pile. This is not the right do-it-yourself job for walls that support a driveway, a building foundation, a steep cut slope, or any wall near a septic field, a stream, or a property line where discharge is constrained. Those cases need site-specific engineering because the drainage load is tied to soil pressure, surcharge, and local codes, not just a rule of thumb. For a typical landscape wall, though, you can calculate retaining wall drainage needs well enough to size the pipe, stone, and outlet correctly.
What retaining wall drainage calculation actually tells you
A good retaining wall drainage calculation tells you three things: the volume of water your wall must move, the speed at which it should move that water, and the route it will take to leave the wall. In plain terms, I want you to answer three questions before you choose a perforated pipe or a drainage stone layer: How much water can the backfill hold? How fast can it collect after a storm? Where does it exit?
Start with the assembly, not a fancy formula. Free-draining aggregate. A perforated pipe at the base. A clean outlet. And a way to keep fines out. A perforated pipe is pipe with holes or slots that collects water inside the wall base and carries it away. A drainage aggregate is washed gravel or stone, usually 3/4 inch to 1 1/2 inch, that gives water open paths. A filter fabric or separator keeps soil fines from clogging the stone. Those parts only work if the pipe has slope and the outlet is lower than the inlet. For more on drainage basics, see the FHWA drainage manual and NC State Extension guidance on geotextiles and soil filtration. FHWA Drainage Manual and NC State Extension on geotextiles are good starting points.
Here’s the practical test: can the drain path empty faster than the backfill sheds water? If your site gets intense rain, or if the backfill is clayey, the wall needs more drainage capacity and better separation from fine soil. If the site is well drained sandy soil, the same wall may need less stone volume but still needs an outlet and cleanouts. I would treat a wall without an outlet as wrong from the start; a pipe that ends nowhere is just a hidden reservoir, and a local engineer or building official should be consulted if the discharge path is uncertain. Ugly truth, but true.
One useful frame is this: drainage design is not about “making water disappear.” It is about preventing hydrostatic pressure, the water pressure that builds behind a wall when drainage fails. That pressure can add a lot of force even in a small wall. A wall that is fine in dry weather can begin to bulge after a series of wet days if the drainage layer is undersized or clogged. Nasty little surprise.
How do I calculate the drainage volume behind a retaining wall?
You calculate retaining wall drainage needs by estimating the water-holding voids in the backfill zone and then matching that to a pipe and outlet that can empty the zone faster than it fills.
Measure the wall first. Record:
- Wall length
- Retained height
- Drainage zone thickness behind the wall, often 12 to 24 inches of free-draining stone
- Depth of the pipe bed, usually near the bottom course
Then figure out how much of that drainage zone is really open space. Clean angular gravel usually has substantial open space, but not 100 percent, and the exact value depends on gradation and packing. You do not need a laboratory value to be useful; you need a conservative estimate. If you use a coarse, washed aggregate, treat the void space as substantial; if the stone is mixed with fines, assume much less and expect clogging. For design details, check manufacturer data or consult a geotechnical or civil professional if the wall is critical.
The practical method is simple:
- Calculate the drainage stone volume behind the wall in cubic feet or cubic yards.
- Estimate the void fraction of the stone bed.
- Multiply the two to get the water storage volume.
For example, a wall that is 30 feet long with a 2-foot thick drainage zone and 4 feet of retained height has a stone zone of 240 cubic feet before you subtract for voids and wall shape. If the void space is roughly a third of that volume, the stone layer can temporarily store on the order of 80 cubic feet of water. That is not a design guarantee; it is a check that tells you whether a tiny pipe and one short daylight outlet are obviously too small.
For slope, I would use at least 1 percent fall on the perforated pipe, and 2 percent is better if the layout allows it. One percent means 1/8 inch per foot; two percent means 1/4 inch per foot. Verify the fall with a string line, builder’s level, or laser level. If the pipe rises anywhere, water will pond there and fines will settle into the low spot. That part goes bad fast.
If you want a more formal estimate of storm runoff into the wall zone, the Rational Method is often used in drainage work: Q = C × i × A. Here, Q is flow, C is runoff coefficient, i is rainfall intensity, and A is contributing area. I am not giving you a fake hard number for intensity, because that depends on your locality and storm duration. Check your local design storm data or a municipal drainage handbook. For a small retaining wall, the exact runoff equation matters less than making sure the outlet is larger than the pipe can use and the backfill cannot clog the system.
How do I size the pipe, gravel, and outlet step by step?
Match the pipe, stone, and discharge path to the wall. That’s the game.
- Measure the wall geometry. Record wall length, retained height, and backfill width in inches or feet. A common drainage zone is 12 to 24 inches behind the wall. Verify that you have the actual finished grade, not the excavated grade. A problem shows up when the backfill slope or terrace reduces the available drainage width.
- Classify the soil behind the wall. Identify whether it is sandy, loamy, or clayey fill. Coarse soil drains freely; clay holds water. Verify by texture and drainage behavior, not just by what the seller called it. A problem is a “clean” fill that still contains fines and turns the stone bed into a sponge.
- Set the drainage zone thickness. Use 12 inches as a minimum practical stone zone and 18 to 24 inches where water loads are heavier or soil is tighter. Verify that the zone runs continuously from the base to near the top of the retained height, except for any cap or setback details. A problem is a stone pocket that stops short and traps water above it.
- Choose a pipe diameter. For many small landscape walls, 4-inch perforated pipe is the common baseline. Verify that the pipe is rated for burial and can be laid with a consistent slope. A problem is using a crushed or thin-wall pipe that collapses under compacted backfill.
- Lay out pipe slope. Keep at least 1 percent fall to daylight or to a solid outlet. That is about 1/8 inch per foot. Verify slope over the full run, not just at the ends. A problem is a belly in the pipe where water stands and silt accumulates.
- Specify clean aggregate. Use washed drainage stone, often 3/4 inch minus fines is not acceptable here; you want stone with little or no fines. Verify that the material is clean enough that water moves through it quickly. A problem is using road base or pea gravel with dust that migrates and clogs the system.
- Add a separator. Use geotextile filter fabric or an approved separation detail between native soil and the drainage stone. Verify that the fabric wraps the stone without blocking the outlet. A problem is wrapping the pipe so tightly that the system becomes a sealed sock full of silt.
- Size the outlet to the flow path. Daylight the pipe to a free-draining spot or connect to a lawful drain. Verify that the outlet is lower than the pipe start and protected from rodent, debris, or mower damage. A problem is a pipe that ends into backfill, a catch basin that overflows, or an outlet that freezes shut.
Trust the three-part system, not just the pipe. In a retaining wall, the stone layer stores and routes water, the pipe evacuates it, and the outlet finishes the job. If any one of those three is weak, the wall still gets wet.
What should I check before I assume the wall will drain?
Check the soil, the slope above the wall, and the outlet path before you assume the wall will stay dry.
First, look at surface water. A swale is a shallow channel that carries runoff around the wall rather than into the backfill. A wall can have a strong drain at the base and still fail if roof downspouts, driveway runoff, or a lawn slope dumps water directly behind it. I would never count on subsurface drainage to fix a bad surface-water layout. See retaining wall backfill basics and how to build a swale for related planning steps.
Next, look at the backfill. If the fill is compacted clay or contains a high percentage of silt, the wall needs a better separator and a wider drainage zone. Clay can stay wet long after a storm, and wet clay exerts more pressure than dry granular soil. If the site has a history of seepage or springs, the standard 4-inch perforated pipe may still be fine, but only if the outlet is reliable and the entire drainage blanket is continuous. For soil behavior and drainage limits, USDA NRCS soil guidance and the FHWA manual are useful references. USDA NRCS soil resources and the FHWA Drainage Manual are both credible starting points.
Then inspect the outlet. It must discharge to a place that can accept the flow without eroding, freezing, or violating local rules. A daylight outlet on a slope is simple. A tied-in storm drain may be acceptable only if the connection is permitted and the system has capacity. If the water has nowhere to go, the calculation is moot.
Also check the season. After a 50-year storm or even a stubborn multi-day rain, the wall should not show seepage through joints or face movement. I am not claiming that exact storm size is right for your site; local drainage standards set the design storm. The point is that your wall should have a margin, not a pipe that works only in dry weeks. A wall that passes in August but fails in April is no bargain.
When should I stop and use a different approach?
Stop this approach when the wall is doing structural work, the drainage outlet is uncertain, or the site has conditions that make a simple gravel-and-pipe detail unreliable.
The wall is taller than about 4 feet and supports a steep grade: The load rises fast, and drainage is only one part of the problem — get an engineered wall design and do not rely on rule-of-thumb sizing.
The wall supports a driveway, patio, or structure: Surcharge load can add enough force to change the drainage and structural requirements — use a design that accounts for live load and compaction.
There is seepage, a spring, or wet soil year-round behind the wall: You are dealing with groundwater, not just stormwater — add a subdrain or underdrain detail designed for continuous flow, or get site-specific help.
The outlet cannot daylight or drain legally: A pipe without a discharge path is not a drainage system — redesign before building, because blind outlets fail and can overload the wall.
The backfill is silty clay or contaminated with fines and cannot be changed: Standard stone and fabric details can clog faster than they should — use a broader drainage zone, better separation, and expect maintenance, or switch to a different wall type.
The wall is near a foundation, septic area, or property line: The drainage discharge may create damage or code issues — stop and confirm the drainage path before construction.
This is where “good enough” gets expensive. A wall that is slightly over-drained costs a little extra stone; a wall that is under-drained can need reconstruction. I would choose caution here, and I would ask a licensed pro if the wall is near structure or groundwater.
The mistakes people actually make, and what they cost
The most common mistake is using the wrong stone. People fill the back of the wall with base material that contains fines, or with rounded river rock that does not lock or drain the way they expect. The consequence is slow drainage and silt buildup. The fix is washed drainage aggregate with a clear separation from native soil. For retaining wall drainage needs, that detail matters more than the color or brand of stone.
Another mistake is running perforated pipe flat. A pipe without slope behaves like a trough. The consequence is standing water, clogging, and freeze damage in cold climates. The correct alternative is at least 1 percent fall all the way to the outlet.
A third mistake is wrapping the whole pipe assembly in the wrong fabric. Fine geotextile can help, but if it is installed so tightly that it traps sludge against the pipe, maintenance gets harder. The consequence is reduced flow after a few wet seasons. The better move is to separate soil from stone thoughtfully, not suffocate the drain. The NRCS and FHWA both emphasize matching the separator to the soil and drainage path.
A fourth mistake is forgetting surface water. Downspouts, grading, and paved surfaces can dump far more water behind the wall than the drain was sized for. The consequence is hydrostatic pressure even when the pipe itself is clear. The correct alternative is to intercept water uphill before it reaches the wall.
A fifth mistake is leaving no inspection point. A buried system that cannot be checked is hard to keep clean. The consequence is no way to spot a blocked outlet until the wall starts to bulge. A cleanout or visible outlet makes maintenance possible.
A sixth mistake is treating every wall the same. A 3-foot garden wall in sandy soil is not the same as a 6-foot wall in clay with roof runoff above it. The consequence is overconfidence in a detail that was never sized for the site. The correct alternative is to calculate retaining wall drainage needs for the actual conditions, then build the wall that matches them.