
 By Admin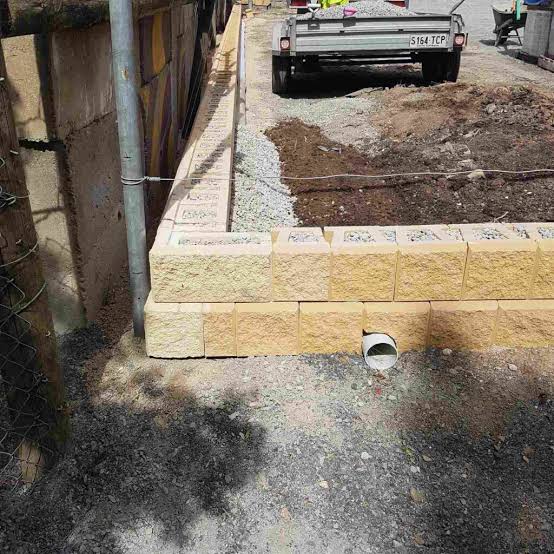
Last updated: September 10, 2026
Key Takeaways
- Add a second line 12 to 24 inches behind it so you know how much excavation space you need.
- In the U.S., dial 811 before excavation.
- If the wall will be more than about 4 feet high, consult a professional; many jurisdictions require engineering or permits once a wall retains significant soil, according to the International Building Code and local rules.
- Dig a trench at least 6 inches deep for the compacted crushed-stone base, and wider than the block by about 6 to 12 inches.
A retaining wall holds back soil. The tricky part is water and pressure; get those wrong and the wall can move, lean, or fail. This guide on how to build a retaining wall step by step is aimed at the small landscape walls most homeowners take on, and it starts where the trouble usually starts: the base, drainage, and backfill. The wall matters. So do the layers beneath it.
Contents
- Who this applies to — and who should do something else
- How do you build a retaining wall step by step?
- What does a retaining wall cost, and how long does it take?
- What mistakes do people actually make?
- When should you stop and call a retaining wall contractor?
- How do you deal with slopes, corners, and wet soil?
- What should you ask before hiring someone?
- FAQs
Who this applies to — and who should do something else
This guide is for homeowners planning a small to medium retaining wall, usually for a raised bed, a terraced yard, or a slope that needs control rather than major excavation. I’m assuming you already know where the wall will go, have a rough wall length and height, and can handle basic tools such as a shovel, level, hand tamper, tape measure, and a string line. I’m also assuming the wall will use segmental retaining wall blocks, pressure-treated lumber only where allowed, or natural stone in a simple gravity-wall setup — but if the site or system is unclear, check with a local pro or the block manufacturer.
Above about 4 feet, bring in a professional instead of treating it like a weekend DIY project. Many jurisdictions want engineering, permits, or both once the wall retains a meaningful load, and the International Building Code directs homeowners to local requirements for retaining walls. Taller walls also need tighter drainage, soil reinforcement, and sometimes geogrid, a soil-reinforcing mesh buried behind the wall in layers. Honestly, that’s where the job gets fussy. I would also stop and call a contractor if the wall has to support a driveway, a structure, a steep drop, or a very wet slope. Those conditions change the load, and the wrong detail can turn into an expensive failure.
Climate changes the picture, too. In freeze-thaw regions, the base has to sit below frost-sensitive soil and drain well, or the wall can heave. In places with heavy rain or clay soil, drainage becomes the main issue. Sandy soil with little frost is easier, but not by much; the build order stays the same, just with fewer headaches. If your yard has spring runoff, a perched water table, or existing seepage, get professional advice before you dig. The U.S. Department of Agriculture and local extension services both note that wet soils can change load and drainage behavior quickly. That math stops working fast.
How do you build a retaining wall step by step?

Lay out the wall, excavate a level base, install drainage, set the first course perfectly, then stack each layer with a backward lean and proper backfill. The order matters because most failures start at the bottom. Not the top.
- Mark the wall line with stakes and string. Set stakes at both ends and run a taut string where the front face of the wall will sit. Add a second line 12 to 24 inches behind it so you know how much excavation space you need. Verify the line is straight and the corners are square if the wall turns. A problem is a wavy line or a layout that forces you to cut blocks at odd angles everywhere.
- Call for utility locating before you dig. In the U.S., dial 811 before excavation. Verify marked utilities are clear of the trench and check for buried irrigation, lighting, or invisible drain lines on your own property. A problem is any digging near unknown lines; even a shallow trench can hit gas, electric, or telecom service.
- Excavate for the base. Dig a trench at least 6 inches deep for the compacted crushed-stone base, and wider than the block by about 6 to 12 inches. For many small walls, the trench should be level front to back and side to side. Verify the trench bottom is firm, not soft topsoil. A problem is a trench that still has organic soil or loose fill in it, because that base will settle unevenly.
- Install and compact the base material. Add 4 to 6 inches of compacted 3/4-inch minus crushed stone or similar angular base aggregate, placed in 2-inch lifts and compacted each lift with a plate compactor. Verify the base is level within about 1/8 inch over a few feet and fully dense under foot. A problem is rounded gravel or one loose thick layer, which shifts under load.
- Lay the first course carefully. Set the first row of blocks on the base and tap each piece into level with a rubber mallet. Verify the entire course is dead level front to back and side to side, because every higher course copies this one. A problem is even a slight slope in the first course; that error grows with every layer.
- Build in a setback if the system requires it. Many segmental blocks have a built-in batter, meaning the wall leans slightly back, often around 1 inch per 12 inches of height, depending on the block system. Verify the blocks are oriented correctly and interlock as the manufacturer intended. A problem is stacking them perfectly vertical when the system is designed to lean back.
- Add drainage stone and pipe behind the wall. Place clean drainage aggregate, often 3/4-inch clean stone, behind the blocks and install a perforated drain pipe at the base, sloped about 1/8 inch per foot to daylight or to an approved outlet. Verify the pipe can actually drain somewhere; a pipe to nowhere is only a wet cavity. A problem is using soil right behind the wall or forgetting an outlet.
- Backfill in lifts as you go. Add 6 to 8 inches of backfill at a time behind the wall and compact it in layers, keeping heavy compaction equipment away from the wall face. Verify the wall does not bulge while you compact and that each course stays level. A problem is dumping all the backfill at once, which can push the wall out of plumb.
- Cap, finish, and manage water above the wall. Glue or pin cap blocks if the system calls for it, then grade the ground above the wall so water sheds away, not into the top edge. Verify runoff is directed around the wall and not toward it. A problem is a beautiful wall with poor surface drainage, because water is what shortens its life.
The exact numbers can shift with the wall system, local code, and soil type, but the logic stays put: level base, drainage, compacted backfill, and a true first course. Fix any weak link before you stack higher; otherwise, the whole thing inherits the mistake.
What does a retaining wall cost, and how long does it take?
A small retaining wall often costs more in labor and excavation than in blocks, and the total depends on height, access, drainage work, and whether the site has to be dug by hand. A simple short wall may take a long day or two for a competent crew, while a tougher job with poor access or wet soil can run for several days. If you are hiring the work out, ask for excavation, base prep, drainage, geogrid if needed, spoil removal, and finish grading to be included; those are the pieces that often vanish from the first quote.
The price range varies too much by region to give a trustworthy universal number, but the main cost drivers are easy to spot. More height means more material and more engineering. Tight access means more labor. Clay soil and seepage mean more drainage stone, pipe, and possibly an underdrain outlet. Straight walls are cheaper than curves, corners, and steps. Natural stone usually costs more to install than modular concrete block because fitting takes longer. If a contractor prices only the visible wall face and skips drainage, get a second estimate or consult a professional, because that bid is incomplete. Smells like a shortcut.
A good result is more than “it stands up.” The wall should look straight in plan, sit level in each course, lean back as designed, and show no open joints, gaps, or bulges. The grade above it should slope away at a sensible pitch, and water should have a clear path out of the drainage system. If the finished wall already looks strained, the problem is usually in the base or drainage, not in the cap.
What mistakes do people actually make?
The most common mistake is building on soil that was never properly compacted. That leads to settlement, and settlement turns into a leaning wall or a crack line. The fix is simple in theory, harder in practice: excavate down to firm subgrade and rebuild the base in compacted lifts.
Another common slip is using the wrong backfill right behind the wall. Fine soil holds water; water adds pressure. A wall with muddy backfill can look fine for a season and then bow. Better choice: clean drainage stone directly behind the wall and soil farther back.
A third error is skipping the perforated drain pipe or giving it no outlet. That traps water behind the wall. The consequence is hydrostatic pressure, the sideways force from water. The alternative is to route the pipe to daylight or another lawful drainage point with real slope.
People also set the first course by eye. Even a small error in the base becomes a larger error at the top. The correction is to spend the time getting the first course level and tight before any higher rows go on.
A fifth mistake is compacting too aggressively right next to the wall face. That can shove blocks out of line, especially on smaller systems. Safer move: compact in lifts, keep the compactor back from the face, and use hand tamps near the wall.
Finally, some people choose a wall system that is wrong for the site. A light gravity wall is not a cure for a steep, wet slope or a driveway edge. In those cases, the right answer may be an engineered wall, not a standard segmental stack.
When should you stop and call a retaining wall contractor?
Stop when the site tells you the wall needs design, not just installation. That’s the line between a manageable landscape wall and a structure that can fail if the details are off.
The wall is taller than about 4 feet: many places require engineering or permits at this height, and the load rises fast — hire a contractor or engineer before digging.
The wall supports a driveway, parking area, fence, or building: those loads change the design, sometimes by a lot — do not use a basic gravity-wall approach.
Water is already coming out of the slope or pooling at the base: the wall is fighting drainage, not just soil — fix the drainage plan first, or you may trap water behind the wall.
The soil is soft, organic, or obviously filled in recently: the base may not hold long term — excavate deeper or get a site plan from a qualified builder.
The wall needs curves, stairs, terraces, or sharp corners: those details add movement and load changes — use a system and layout plan suited to that geometry.
You cannot get a legal outlet for the drain pipe: a drain with nowhere to go is not a drain — redesign the wall or change the drainage route before building.
For a small garden wall on stable ground, DIY can be reasonable. For anything that protects property, carries a surcharge, or sits on uncertain soil, I’d rather see a professional plan than a hurried wall.
How do you deal with slopes, corners, and wet soil?
Change the standard method in three spots: base depth, drainage path, and reinforcement. On a slope, the bottom of the trench may need to be stepped instead of cut as one long level shelf. Each step should still sit on a level, compacted base, usually with at least 6 inches of stone under the first course. The wall should never be forced to follow a slope in one continuous diagonal line.
Corners need special attention because they concentrate movement. Interlock the blocks exactly as the system calls for, and do not leave a corner joint unsupported. If the wall turns sharply, check the block manufacturer’s corner pieces or split patterns rather than improvising with awkward cuts. Corners can act like little hinges if you get lazy there.
Wet soil is the hardest common case. Clay can hold water and expand when wet, which adds pressure and can heave the wall in freeze-thaw conditions. In that setting, I would use more drainage stone, make sure the pipe has a positive slope, and avoid using soil directly behind the wall for at least the first 12 inches. If water is flowing toward the wall from uphill, surface swales or a French drain may be needed before the wall goes in.
Where frost is a factor, the base must be built to resist movement from freezing water. That means good drainage, compacted aggregate, and no trapped pockets of saturated soil. A wall that works in a dry climate can fail quickly where winter freeze-thaw is common if the base stays wet.
What should you ask before hiring someone?
Ask how they handle excavation depth, drainage, base compaction, and permits — not just what block they use. A contractor should be able to explain whether the wall needs geogrid, what type of outlet the drain pipe will use, and how they plan to deal with runoff above the wall. If they cannot explain those pieces in plain language, keep looking.
Ask what is included in the price: digging, haul-off, crushed stone, pipe, fabric if used, cap blocks, cleanup, and final grading. Ask how they handle unexpected soft soil or buried debris, because that can change the scope fast. Ask whether the wall system they propose is suitable for the height and soil conditions on your lot, and whether they will follow any local permit or inspection requirements.
It also helps to ask for the expected schedule in days, not vague promises. A straightforward small wall may be completed quickly, but weather, access, and compaction all add time. If someone promises a large wall in an unrealistically short window, that is a warning sign that the base or drainage may be rushed.
FAQs
How deep does a retaining wall base need to be?
For a small wall, I would expect at least 6 inches of compacted crushed stone beneath the first course, with deeper excavation if the soil is soft or the climate freezes.
Do retaining walls always need drain pipe?
No, but if the wall holds back soil that can get wet, I would strongly favor a perforated drain pipe and drainage stone. Without a drain, water pressure becomes the hidden load.
Can I build a retaining wall on a slope?